So you’ve just got your HomePod and you can wait to actually put it through its paces. You’ve got the FLACC files and your Apple Music test playlist ready to go. But before all that you need to setup the HomePod. And to Apple’s credit, they’ve made the setup process really easy. You can be up and running in under a minute!
There are only two things you need to know about. We’ll cover the details in the step by step process below.
Read more: Top 10 HomePod Features
How to Setup HomePod

Step 1: You’ll first need to update your iPhone or iPad to iOS 11.2.5 (you can do that from Settings -> General -> Software Update).
Step 2: Then, connect the HomePod to the electric outlet.
Step 3: Just bring your iPhone close to your HomePod after it’s powered on. A pairing menu will automatically slide up (the process is similar to pairing AirPods). Tap the Set Up button.
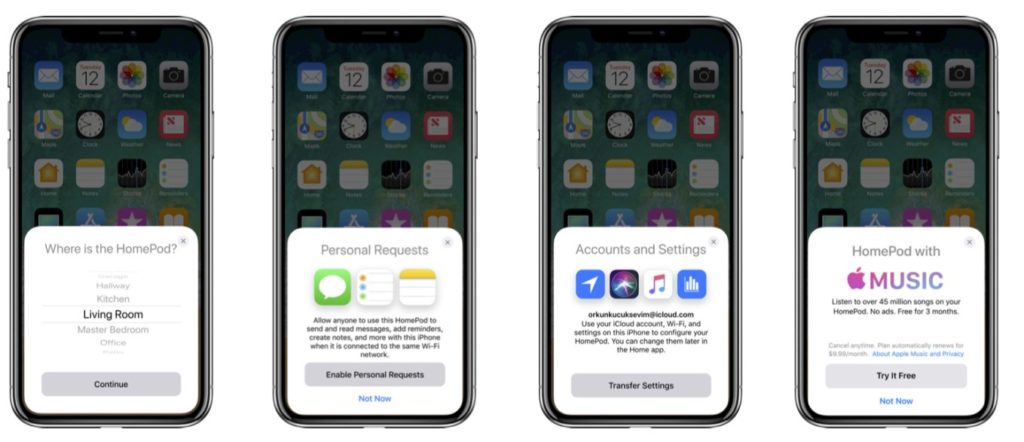
Step 4: If you have multiple Home scenes set up in the Home app, you’ll see an option to choose one of them for HomePod (but most of us won’t see that option). Next, HomePod will ask you which room or area your HomePod is in (Living Room, Kitchen and so on).
Step 5: Now comes the important part. Apple will ask you if you want to enable the Personal Requests feature. This is the feature that lets HomePod read and reply to messages, take notes and add reminders. This feature only works when your iPhone is on the same network.
But if you live with friends or family, we suggest you don’t turn on this feature. Because HomePod doesn’t do Voice ID and anyone can walk up to HomePod and reply to your messages! Tap Enable Personal Requests to turn the feature on or Not Now to disable it. You can change your preference later from settings as well.
Step 6: Next, agree to the terms and conditions.
Step 7: Then tap on the Transfer Settings button and your iOS device will start transferring important information like your iCloud account, Wi-Fi network and other settings from your device. After you hit the button, HomePod will emit a tone. This is an audio-based pairing authentication system, similar to Apple Watch’s image-based authentication. Before the transfer is done, you’ll be asked to enter your Apple ID password.
Step 8: If you’re not yet subscribed to Apple Music, you’ll get a prompt to try the service for free for three months.
Step 9: Now your HomePod is setup and Siri on HomePod will take over and will walk you through how HomePod works. She will ask you to repeat some questions so you get a feel of how it all works.
And that’s it. Your HomePod is setup. Go ahead and say “Hey Siri play my favorites” and HomePod will start playing your Favorites Mix on your HomePod. I think that’s a great way to get started with HomePod.
But you can ask HomePod to play anything from its 45 million songs library. It will even work with songs you’ve uploaded using iCloud Music Library.
What’s It Like?
Have you tried the HomePod with your favorite music? Does it live up to the hype? Share with us in the comments below.
