Want to capture that epic game win or hilarious meme on your Mac? Struggling with confusing button combinations? Fear not! Our “How to Screenshot on a Mac” guide will have you snapping pics of your screen like a pro in no time.
Follow our step-by-step instructions and learn the keyboard shortcuts to capture your entire screen, specific windows, or even just a selected area. Let’s take control and master those screenshots!
Importance of Taking Screenshots
Screenshots are versatile tools that let you quickly capture information, such as saving a receipt from an online purchase or capturing a moment in a video call.
Sharing content with friends or colleagues is easy with screenshots, whether it’s a funny meme or an important graph from a report.
Taking screenshots on a Mac is simple and convenient, thanks to built-in tools and shortcuts that allow you to capture what you need without interrupting your workflow.
How to Screenshot on a Mac: The Different Methods
There are several methods for taking screenshots on a Mac, each suited to different needs. With the methods we highlight below you’ll learn how to take screenshots on Mac.
Using Keyboard Shortcuts

Keyboard shortcuts are the quickest way to take Mac screenshots.
- Pressing Command (⌘) + Shift + 3 captures the entire screen, while Command (⌘) + Shift + 4 allows you to select a specific area on the screen.
- For those who need to capture a single window, Command (⌘) + Shift + 4 followed by the Spacebar will do the trick.
Using the Screenshot App

The Screenshot app, introduced in macOS Mojave, offers a user-friendly interface for taking screenshots and screen recordings. You can open it by pressing Command (⌘) + Shift + 5.
This brings up a toolbar with options to capture the entire screen, a selected portion, or a specific window. You can also record your entire screen record here, which is perfect for creating tutorials or capturing gameplay.
Using Preview to Take Screenshots
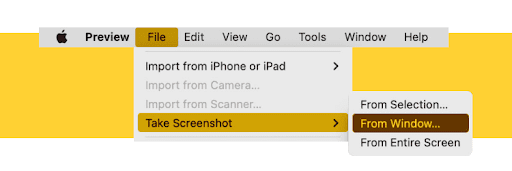
Preview is another versatile tool for taking screenshots.
Open Preview, go to the File menu, and select “Take Screenshot.” From here, you can choose to capture or screen record the entire screen, a selected window, or a portion of the screen. Preview also allows you to annotate and edit your screenshots immediately.
Setting Timers and Other Options
For more control over your screenshots, the Screenshot app allows you to set timers and other options. You can set a delay before the screenshot is taken, which is useful for capturing timed events. Additionally, you can choose where to save your screenshots and whether to include the mouse pointer in the capture.
How to Screenshot on a Mac: Different Capture Options

Taking screenshots on a Mac is straightforward with various built-in options. Here, we’ll explore how to capture a screenshot of your entire screen, a selected portion, or a specific window.
Capture Entire Screen
Shortcut: Command (⌘) + Shift + 3
Using this shortcut captures the entire screen and instantly saves the screenshot image to your desktop. This is a quick way to take a full-screen capture without any additional steps. The simplicity of this method makes it ideal for capturing everything visible on your screen at once.
Capture a Selected Portion
Shortcut: Command (⌘) + Shift + 4
This shortcut transforms your cursor into a crosshair. Click and drag to select the area you want to capture. Once you release the mouse button, the screenshot is taken and saved to your desktop.
This method is perfect for capturing specific parts of your screen without extra content. It allows you to focus on and save just the information you need.
Capture a Specific Window
Shortcut: Command (⌘) + Shift + 4, then press Spacebar
After pressing the shortcut, your cursor will change to a camera icon. Hover over the window you want to capture and click on it. The screenshot tool captures just that window and saves the image to your desktop.
This is ideal for isolating content from one window without background clutter. This method ensures a clean capture of your chosen window, free from other desktop distractions.
How to Screenshot on a Mac: Editing and Annotating Screenshots
Here are ways to edit screenshots and annotate screenshots on a Mac:
Using the Preview Tool
Opening your screenshots in Preview is a snap. Just double-click the open screenshot file, and it’ll open right up in Preview.
- Basic Editing Tools: In Preview, you can crop, resize, and rotate your screenshots. These basic tools make it quick and easy to adjust the image exactly how you need it. You can also use Preview to export your screenshots in different formats.
Using Markup Tool
The Markup tools are right at your fingertips from the screenshot preview thumbnail that pops up in the bottom-right corner of your screen after you take a screenshot.
- Accessing Markup Tools: Click the thumbnail to open the screenshot in the Markup window. If you miss the thumbnail, no worries—you can open it in Preview and get to the Markup tools from there.
- Available Annotation Tools: The Markup toolbar is packed with tools to add text, shapes, and even signatures. You can also use drawing tools to doodle or annotate your screenshots, making it easy to highlight important areas or add notes.
How to Screenshot on a Mac: Saving and Sharing Screenshots
Once you’ve edited your screenshots, you’ll want to save and share them. Here’s how to handle that.
Default Save Location
By default, your screenshots are saved to the Desktop, so they’re easy to find.
- Changing the Default Save Location: To switch things up, press Shift + Command + 5 to open the screenshot toolbar, click Options, and pick a different save location. This customization helps you organize your files better.
Sharing Options
Sharing your screenshots is super simple and can be done right after you take them.
- Sharing Directly from the Thumbnail: Click the preview thumbnail and hit the share button to send it via email, messages, or other apps. This immediate sharing option saves you time.
- Other Sharing Methods: You can also share your screenshots from Preview or Finder by right-clicking the file and selecting Share. This lets you send the image through email, messages, social media, and more. Additionally, you can drag and drop screenshots into chat apps for quick sharing.
Troubleshooting Common Screenshot Issues
Here are some common problems and how to fix them so you can get back to capturing your screen without any hassle.
Screenshots Not Saving
If your screenshots aren’t saving, first check if they’re being saved to the correct location, typically the Desktop. If not, you can try restarting your Mac. You can also reset the default screenshot path by pressing Shift + Command + 5, clicking Options, and selecting a new save location.
Take Note: Ensure the folder where screenshots are saved isn’t locked and check any third-party apps that might be interfering.
Incorrect Areas Captured
Sometimes, your screenshot might not capture the right area.
Use the correct keyboard shortcuts: Command (⌘) + Shift + 4 lets you select a specific area using the crosshair cursor.
If you’re still having trouble, try restarting your Mac to reset the screen capture settings. Also, make sure your screen is not moving during the capture to avoid errors.
Screenshot Shortcuts Not Working
If your screenshot keyboard shortcuts aren’t working, check your system settings first. Go to the Apple menu, then go to System Preferences. Click on Keyboard and then the Shortcuts tab.
Select Screenshots from the list on the left and make sure all the relevant options are checked and active. Restarting your Mac or updating your macOS can also resolve shortcut issues.
FAQs on How to Screenshot on a Mac
Here we answer a few commonly asked questions about how to screenshot on a mac:
How Do I Take a Screenshot on My Mac?
To take a screenshot on your Mac, use the keyboard shortcut Command (⌘) + Shift + 3 for an entire screen capture, or Command (⌘) + Shift + 4 to capture a selected portion.
How Do You CTRL Screenshot on a Mac?
On a Mac, you typically use Command (⌘) instead of Control for screenshots. For instance, Command (⌘) + Shift + 3 captures the entire screen, while Command (⌘) + Shift + 4 allows for more specific captures.
How Do I Snip and Paste on a Mac?
To snip and paste on a Mac, use Command (⌘) + Shift + 4 to select the area of screen recording you want to capture. The screenshot is saved to the clipboard, and you can paste it using Command (⌘) + V.
How to Screenshot an Entire Page on Mac?
To screenshot an entire page on a Mac, use the keyboard shortcut Command (⌘) + Shift + 3 for an entire screen capture. For longer web pages, you might need a third-party tool to capture the whole page.
How Do I Screenshot a Menu on Mac?
To screenshot a menu on a Mac, open the menu, then press Command (⌘) + Shift + 4, followed by the Space bar. Click the top menu bar to capture it.
Can I Change the File Format of My Screenshots?
By default, Mac screenshots save as PNGs, but you can change this using Terminal here’s how:
Open Terminal (Applications > Utilities) and type: “defaults write com.apple.screencapture type” followed by your desired format (JPG, PNG, TIFF, etc.)
For example: “defaults write com.apple.screencapture type jpg”
Press Enter and restart your SystemUIServer with `killall SystemUIServer`. Now your screenshots will use the new format!
How Do I Take a Timed Screenshot on Mac?
To take a timed screenshot on a Mac, press Command (⌘) + Shift + 5 to open the screenshot toolbar. Click Options and select a timer (5 or 10 seconds) before capturing a full screen screenshot.
Where Can I Find My Screenshots on Mac?
By default, screenshots are saved to your Desktop. If you can’t find them, check the save location in the screenshot toolbar by pressing Command (⌘) + Shift + 5 and clicking Options.
How Do I Take a Screenshot in macOS Mojave or Later?
In macOS Mojave or later, use mac keyboard shortcuts Command (⌘) + Shift + 5 to access the screenshot toolbar, which provides options for capturing the entire screen, a selected portion, or recording your screen.
You can also click keyboard shortcuts like Command (⌘) + Shift + 4 for specific captures.
Final Note on How to Screenshot on a Mac
We’ve covered several methods to take screenshots on a Mac, each suited to different needs. From simple keyboard shortcuts to using the Screenshot app and Preview, there are plenty of options to choose from.
We encourage you to try out these different methods and find the one that works best for you. Whether you’re capturing the entire screen, a specific window, or a selected portion, there’s a solution for everyone.
Remember, knowing how to screenshot on a Mac can greatly enhance your productivity and communication. Screenshots are a powerful tool for sharing information quickly and efficiently, whether it’s for work, school, or personal use.
