This is the first of likely many how to posts on iMessage. I think iMessage has to be one of the coolest, convenient, slick, and most freakin’ confounding apps/services that Apple offers. I love iMessage, but that doesn’t mean it doesn’t drive me round the bend too. In this post, I’m going to cover setting up iMessage, adding more email addresses to iMessage, and connecting all your devices/machines together to be in iMessage sync.
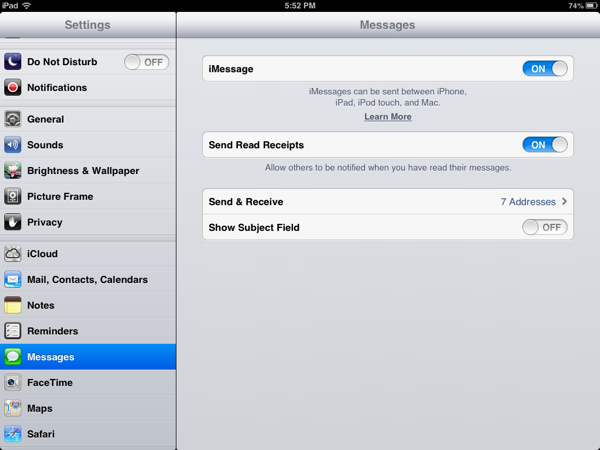
First step, as you can imagine, is turning iMessage on and you do this under Settings -> Messages. If you haven’t set up iMessage before it will ask for you to log in with your Apple ID to proceed. If you have more than one iDevice (iPhone, iPod touch, iPads) or a Mac running Mountain Lion, start this whole process on your iPhone first. I get to why shortly, but trust me, it will save frustration later if you start with your iPhone. If you don’t have an iPhone, then start with any device you feel like.

Assuming you’re starting on your iPhone, iMessage will connect your phone number automatically. You will also be able to add additional email addresses that your friends can use to send you an iMessage with. Generally, the email with your Apple ID should come right up so that’s helpful. For other emails you need to do this.
From the main messages screen in Settings, tap “Send & Receive” to get to the screen where you will see all the places iMessages knows about to send and receive messages. The top section shows the emails (and your phone number) you have set up. The bottom shows where new conversations start from and this will be important later.
To add more emails, just tap “Add Another Email..” and enter the email address. Next you should receive an email from Apple making sure that this is your email and it’s legit. In the verification email will be a link to click on that takes you to Apple’s main Apple ID site. You sign in with your Apple ID and the email should be verified. You’ll have to do this will all your email addresses, but only once (whew).
Once you have all your emails verified (it might take a while for all the emails to come through, so you might need to be patient), you can move onto your next iDevice (or Mac). Before you do though, in the Send & Receive screen, pick where you want all your messages conversations to start from. I set it to my phone number, because it seems to work best for syncing.
On your next iDevice (or Mac) you’ll follow the same steps. Go to Settings -> Messages, Turn on iMessage, and sign in with your Apple ID. Now, since you’ve already set up iMessage on your iPhone (or other device) first, you should see your phone number and email addresses already there. If not you can quickly add them. Make sure you tap each email (and your phone number) so there is a check beside it so that device will get messages sent to that address too. Yes, this is a tedious and maddening step; no arguments here.
Last thing is the “Start new conversations from:” selection. If you picked your phone number on your iPhone, do the same here. Rinse and repeat this on all of your iDevices.
For your Mac—Mountain Lion only, sorry—Messages replaced iChat. The account settings screen looks similar to the iOS version and the process is pretty much the same:

As you’re setting each device, your iPhone is going to receive an alert that “such and such device is using [all your emails and phone number] for iMessage….” This is good. This means things are probably going to sync up for you!
Now, why did I suggest starting on your iPhone? What I’ve found is that if you start on an iPad, for example, your phone number isn’t connected to your Apple ID for message automatically. You’ll receive iMessages on your iPhone just fine, but they might not appear on your other devices. Once you have your iPhone set up, you can (and I’ve done this to force a resync—just this week in fact) go to the device that’s not getting all the messages, go to the Messages settings, log out/turn off Message (you have have it log out your Apple ID, but I found turning messages off does the same thing), then log back in. Your phone number should now appear on the list of places to receive iMessages.
Pain in the tush? Oh you bet. That said, once things are all synced up (having all devices and your Mac starting messages with your phone number or at least the same email address helps) it’s great to be able to send and receive “text” messages regardless of device.
That’s getting started with iMessage. Questions? Comments? Let me know!