
Apple’s M1 Macs have set a new standard with their performance and battery life. However, they are not without their fair share of issues. It was recently reported that the SSD usage on M1 Macs is unnecessarily high, which could greatly shorten their lifespan. If you are worried about your Mac’s SSD health, here’s how you can check it.
It is important to check your Mac’s SSD’s health, irrespective of whether you are using an Intel or M1-based Mac. If the SSD is under heavy stress, you should backup all your data on it in case it fails. Due to the way Macs are engineered, each SSD is tied to the logic board. This means that if the SSD in your Mac stops working, you won’t be able to retrieve the data stored on it.
There are two ways you can check the health of the SSD on your M1 Mac. One is via the built-in System Report feature in macOS. The second involves using a utility called Smartmontools, which needs to be run through the Terminal.
How to Check the SSD Health of Your Mac
Step 1: Click on the Apple logo on the top-left corner of your Mac, followed by About this Mac. From the window that opens, click on System Report….
Step 2: In the System Report window, select Storage under Hardware from the left pane. This will show all the hard disks attached to your Mac.
Step 3: Click on the SSD name under Volume Name from the right pane window. In the bottom pane window, see the S.M.A.R.T Status of the drive. If it is being reported as “Verified,” your Mac’s SSD has no serious issues.
If you want to see even more details regarding your M1 Mac’s SSD’s health, you will need to use Smartmontools.
Step 1: Download and install Xcode on your Mac.
Step 2: Install Homebrew on your Mac. Open Terminal and copy-paste the following command:
/bin/bash -c “$(curl -fsSL https://raw.githubusercontent.com/Homebrew/install/HEAD/install.sh)”
In case Xcode is not already installed in your Mac, you will be prompted to do in Terminal. You can simply press Enter to proceed with the Xcode and Homebrew installation. Depending on the internet connection’s speed and your Mac’s age, this process can take a while.

Step 3: With Homebrew installed, it is now time to install Smartmontools on your Mac. Simply copy-paste the following command in Terminal and press Return:
brew install smartmontools && sudo smartctl –all /dev/disk0
During the installation process, you’ll be prompted to enter your Mac’s password.
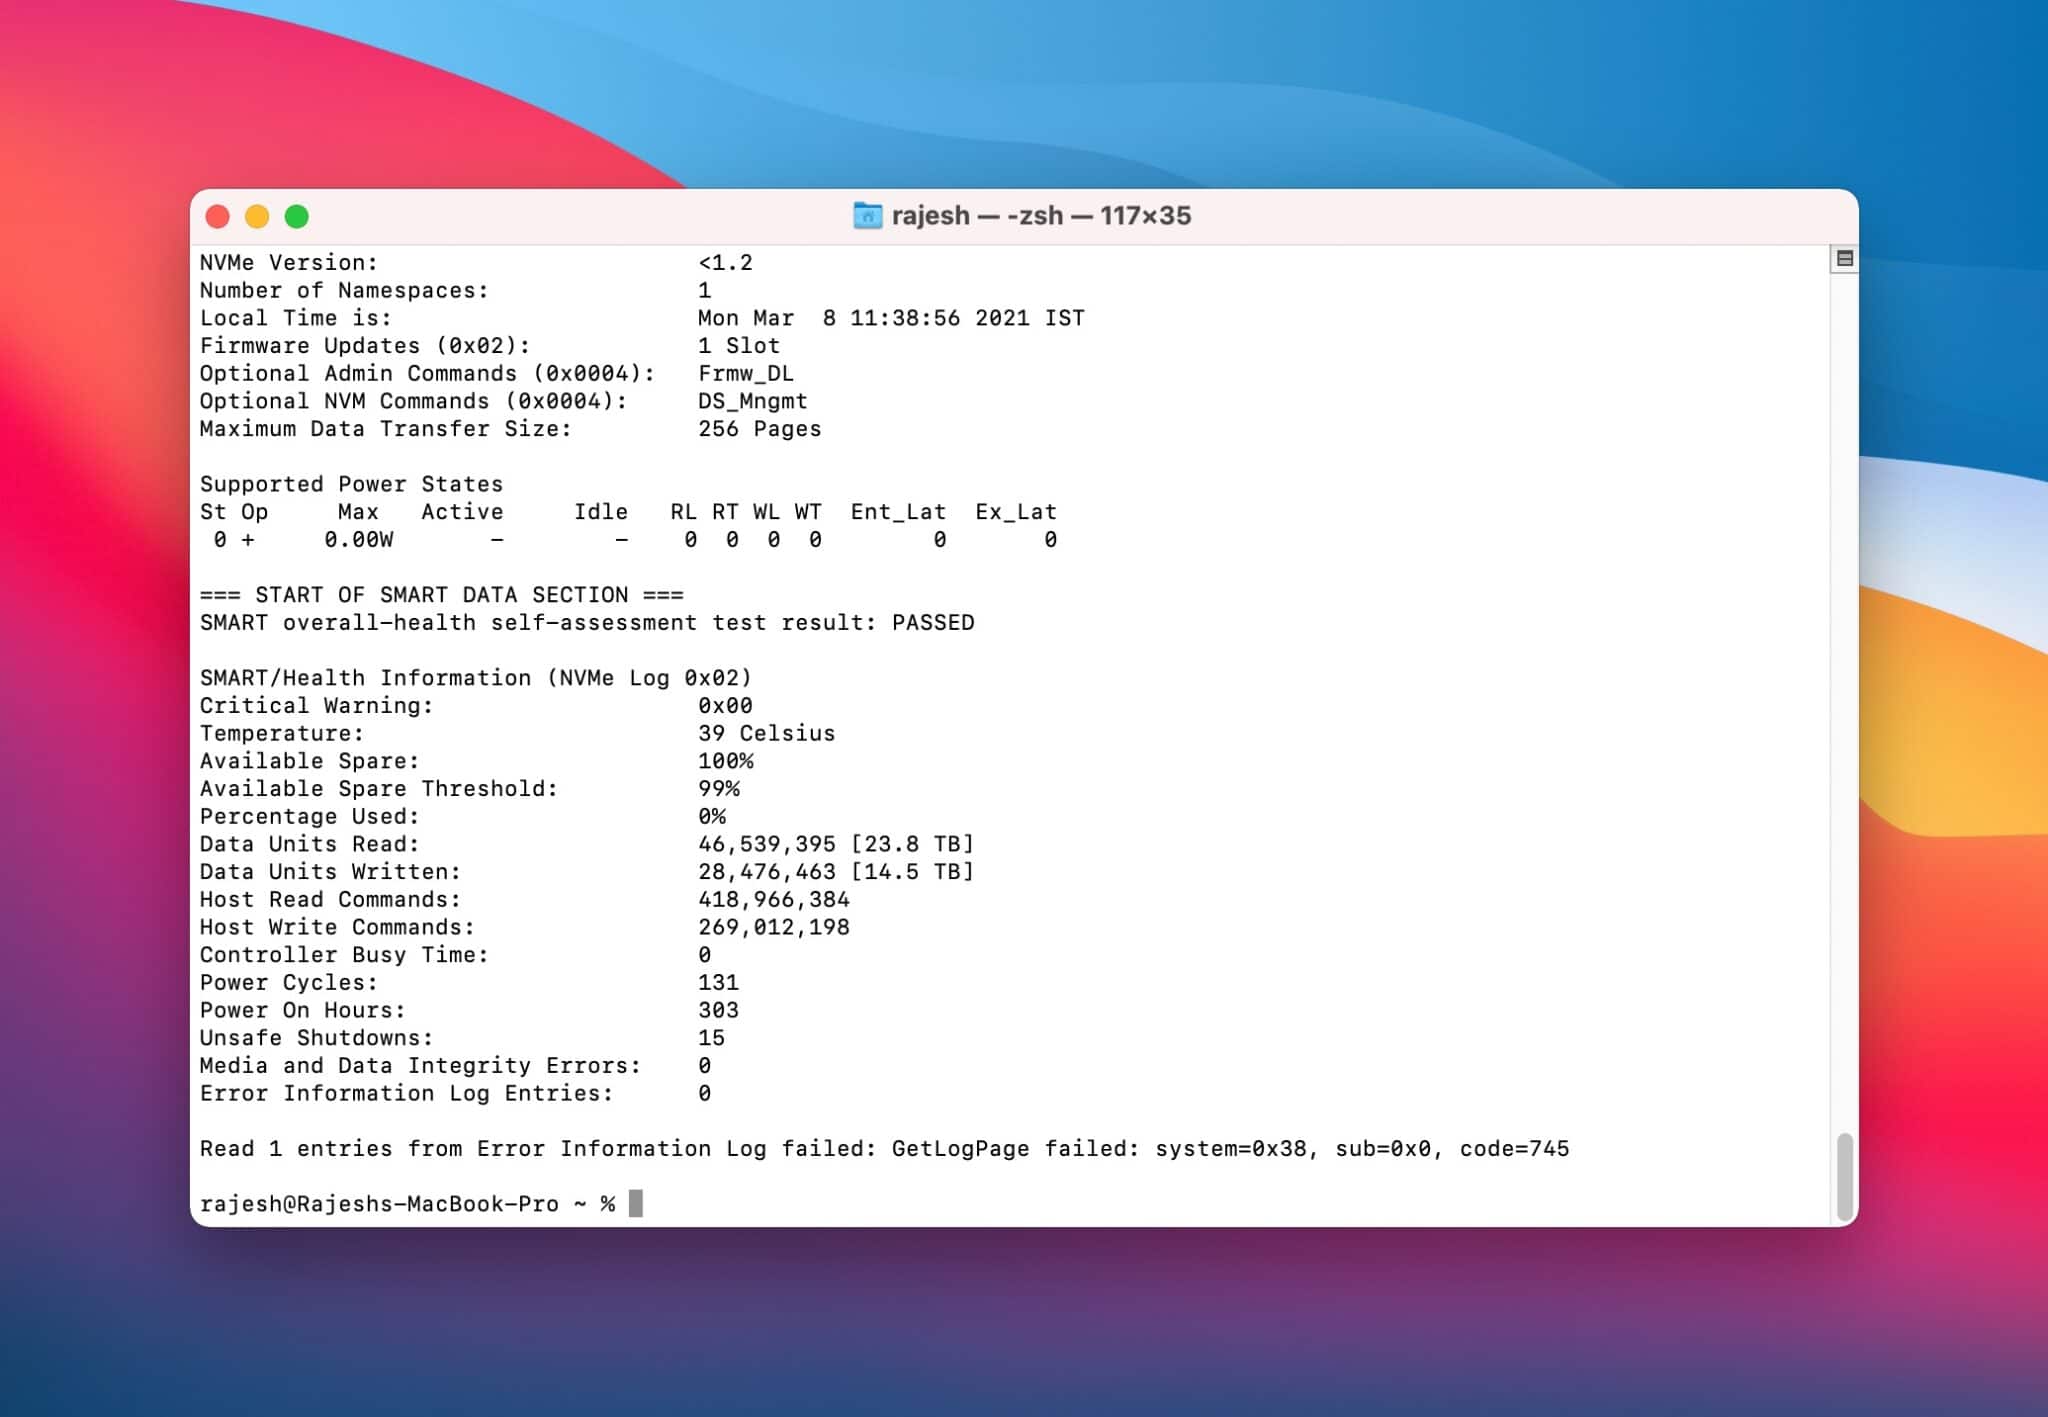
Step 4: After smartmontools is installed, it will automatically scan the “/disk0” SSD on your Mac and output its health details. The log will provide an in-depth S.M.A.R.T status of your hard disk.
Use Smartmontools to Get Detailed Health Status of Your Mac’s SSD
If you want to run smartmontools manually again to check the health of another hard disk or SSD on your Mac, you will first have to find its mount point. The simplest way of doing it is via Disk Utility.
Step 1: Launch Disk Utility. Proceed to right-click on the storage drive from the left pane followed by Get Info.
Step 2: Check the BSD device node of the storage drive as this is the mount point that smartmontools will scan to assess the drive’s health.

Step 3: Open Terminal and paste the below command. Make sure to add the BSD device node of the hard disk you want to scan at the end. So, for example, I will be scanning “disk2” here.
smartctl -a disk2
This will output the health status of the storage drive that you have scanned in Terminal. Understanding the resultant output is important, with the main things you need to be concerned about are the Available Spare Threshold and Percentage Used. Ideally, if you have an M1 Mac, both these numbers should be 0% or 1% at the very maximum.
If you own an M1 Mac and the number is higher than 1-2%, you should wait for Apple to resolve the issue via a software update. It is possible that the upcoming macOS 11.3 Big Sur update will fix the issue.
You can use the same method to assess the health of the storage drives on your Intel-based Macs as well. If you have a relatively old Mac that has been used heavily, the ‘Percentage Used’ number could be anywhere between 5-30%.
If the number is relatively high, you should back up your data as your Mac’s SSD has been used heavily which could impact its lifespan. You can use the same method to find the health of your external storage drives.